Cross Arm Bolt Installation Tips for Global Buyers
When it comes to the installation of cross arm bolts, precision and expertise are crucial. Global buyers often seek guidance to navigate this essential process. Proper installation contributes to the overall stability and safety of structures. The demand for reliable cross arm bolts has increased, making it vital for buyers to understand the nuances of installation.
Experience plays an important role in achieving successful outcomes. Each project presents unique challenges, and understanding these can make the difference. Fitting cross arm bolts correctly requires attention to detail. Discrepancies in alignment can lead to setbacks and safety issues. It’s worth noting that not every installation is flawless. Observing common mistakes can provide valuable insights for improvement.
It is essential to engage with trusted suppliers and experts in the field. Their knowledge can help buyers avoid pitfalls during installation. This guidance can enhance the reliability of cross arm bolts, ensuring structures remain sturdy over time. By reflecting on experiences and learning from challenges, buyers will enhance their competency in this crucial area.
Choosing the Right Cross Arm Bolts for Your Application
Choosing the right cross arm bolts for your application is vital. The type of material used can impact durability and performance. Stainless steel, for example, is known for its corrosion resistance. However, it might not always be the best option for load-bearing scenarios.
Consider the specific requirements of your project. Will the bolts face extreme weather conditions? What load will they carry? These factors greatly influence your selection. Sometimes, a stronger alloy could be more suitable, especially for high-stress environments. Don't overlook the thread type and size. They play a crucial role in ensuring a tight fit.
One common mistake is not testing the bolts before full installation. It’s wise to perform a test run. This can reveal issues with fit or strength. Remember, even the best bolts can fail under unexpected conditions. Be prepared to reassess your choices if needed. Taking the time to evaluate your options will help ensure your project is successful.
Cross Arm Bolt Installation Tips for Global Buyers
| Dimension | Material | Finish | Load Capacity (lbs) | Recommended Application |
| 1/2" x 6" | Carbon Steel | Zinc Plated | 1500 | Utility Poles |
| 3/4" x 8" | Stainless Steel | Passivated | 2000 | Communications Towers |
| 5/8" x 10" | Aluminum | Powder Coated | 1800 | Wind Turbines |
| 1" x 12" | High Strength Steel | Hot Dip Galvanized | 2500 | Heavy-duty Applications |
| 3/8" x 5" | Alloy Steel | Black Oxide | 1200 | Street Lighting |
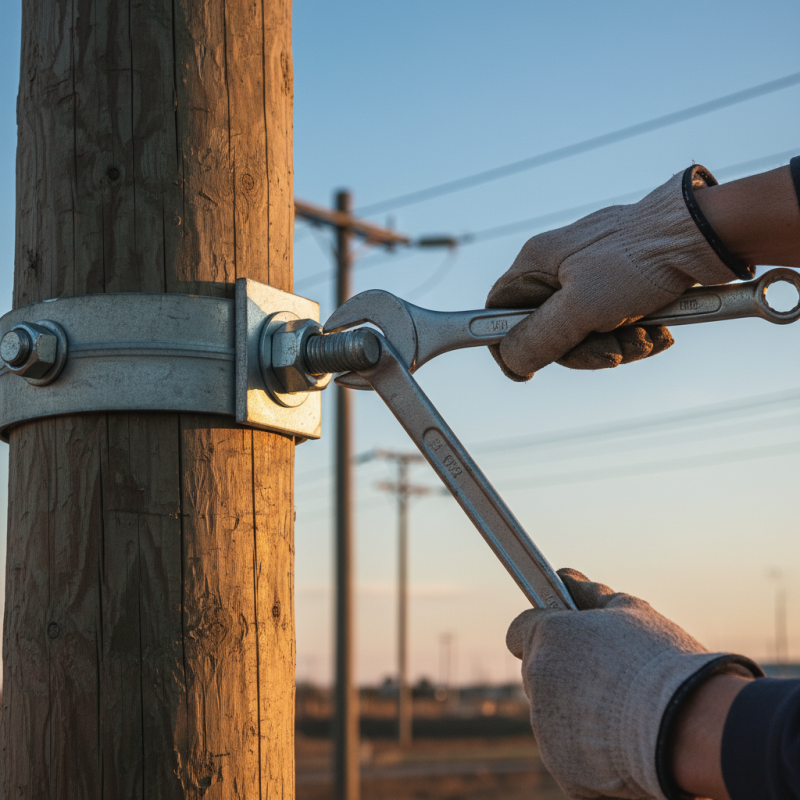
Essential Tools for Cross Arm Bolt Installation
When it comes to cross arm bolt installation, the right tools are paramount. A sturdy wrench set is essential for securing bolts. Make sure to include various sizes to accommodate all types. A torque wrench ensures that each bolt is tightened to the correct specification. This step prevents future issues with alignment and stability.
Safety gear is often overlooked. Wearing gloves protects your hands from sharp edges. Safety glasses shield your eyes from debris. Additionally, a good flashlight can illuminate dark areas, making the installation process smoother. Have a brush or blower handy to clean surfaces before installation. Dirt can disrupt the effectiveness of the bolts.
Errors happen, even for professionals. Sometimes, bolts may not align perfectly on the first try. Patience is key. Double-check each bolt and remeasure if necessary. This reflective approach can save time later. Even with the best tools, mistakes can occur. Adapting and improving is part of becoming proficient in cross arm bolt installation.
Step-by-Step Installation Process for Cross Arm Bolts
When installing cross arm bolts, attention to detail is crucial. Begin by gathering all necessary tools and materials. This includes the bolts, washers, nuts, and a torque wrench. Make sure to wear safety gear like gloves and goggles for protection. Review the project plan carefully. Misreading instructions can lead to mistakes.
Next, position the cross arm in its intended place. Align the holes with the corresponding structures. Insert the bolts, ensuring they fit snugly. Over-tightening can cause damage, so apply torque gradually. Refer to the torque specifications for guidance. Keep checking the alignment as you work. It's easy to overlook small details during installation.
Lastly, double-check each connection. Look for any gaps or misalignments. If something seems off, don’t hesitate to readjust. Document the installation progress. This record helps troubleshoot any issues later. Reflect on the process: what went well and what could be improved? This critical examination ensures better results in future projects.
Common Mistakes to Avoid During Installation
When it comes to cross arm bolt installation, many buyers make common mistakes. One frequent error is not reading the installation manual thoroughly. Manuals often contain crucial specifications and safety tips. Skipping this step can lead to misalignment and, ultimately, equipment failure. Each installation varies, and assuming all procedures are the same can have serious repercussions.
Another mistake is using the wrong tools. Certain bolts require specific wrenches or torque tools for proper installation. Using the wrong tool can strip the bolt or damage surrounding components. Additionally, inadequate preparation of the worksite can cause delays and errors. Ensuring that all materials are on hand is vital for avoiding last-minute scrambles that could lead to oversights.
Lastly, overlooking the importance of torque specifications is a common pitfall. Not achieving the recommended tightness can result in instability. Additionally, checking for any signs of wear or damage before installation is essential. Neglecting this can lead to costly repairs down the line and unsafe conditions. Thoughtful planning and meticulous attention to detail can significantly enhance the installation process.
Common Mistakes to Avoid During Cross Arm Bolt Installation
Maintenance Tips for Ensuring Longevity of Cross Arm Bolts
When it comes to cross arm bolts, maintenance is key to ensuring their longevity. Regular inspections can help identify any signs of wear or damage. Tightening loose bolts is often a necessary step. Use a torque wrench to apply the appropriate pressure, as over-tightening can lead to strip threading. Make sure you check the corrosion levels as well. Bolts exposed to harsh weather conditions are more prone to rust.
Cleaning the bolts is equally important. A simple solution of soap and water can keep them free of grime. For stubborn dirt, applying a soft brush can help. It's essential to dry the bolts thoroughly after cleaning to prevent moisture accumulation. Remember, neglecting these simple maintenance tasks can lead to premature failure.
Another aspect to consider is the environment. High humidity or salty air can accelerate rusting. Using protective coatings may offer additional defense. However, be cautious when applying these coatings; they should not interfere with the bolt's function. Over time, soil accumulation can also affect their integrity. Regularly clearing away debris is wise. Addressing these maintenance tips will go a long way in prolonging the life of your cross arm bolts.
 skip to Main Content
